Integrating MDT into your SCCM OSD workflow
Although UF2 has been configured to allow units to create and use MDT Task Sequences (TSs), each unit will need to do some prep work to take advantage this feature. This is also true for DaRT, which allows admins to remote into the WinPE environment of their OSD deployments.
Please note: This document will not go into anything but the most basic setup info to provide units the ability to monitor and remote into their OSD deployments. It assumes the reader already has a grasp of what MDT is, and will not go into details of setting up MDT, syntax of settings.ini files, etc.
Standing up your unit’s MDT monitoring service
Installing ADK and MDT
To utilize MDT monitoring (and to make DaRT remote sessions easier to initiate), each unit will need to stand up an MDT server that will be reachable by endpoints that are running an OSD TS. There are many parts of the MDT server that will not be used in an SCCM-integrated environment but will need to be installed all the same.
Although MDT will need to be setup on any admin workstation that will want to use MDT in the SCCM console, the monitoring service only needs to be on one machine (and should only be on one machine per unit in most cases).
Let’s begin by downloading the Windows ADK (MDT is part of ADK):
https://docs.microsoft.com/en-us/windows-hardware/get-started/adk-install
Run through the ADK install wizard, accepting the default options.
Now let’s download the MDT:
https://www.microsoft.com/en-us/download/details.aspx?id=54259
Select the architecture for the deployments you will be creating (64 bit version includes support for 32 bit and is the version most units will probably want).
Run through the MDT install wizard, accepting the default options.
Setting up MDT Deployment Share
Once MDT is installed, you will need to open the ‘Deployment Workbench’, which should now be inserted into your Start menu on the machine that MDT was installed on. Right-click on ‘Deployment Shares’ and select ‘New Deployment Share’ as shown below:

You can leave most options at default, but be sure to specify where the share will be located on the local drive and what name the share will have (New SMB share will be created with the contents specified for the local path).
Once the share is created, right click on it and select ‘Properties’:
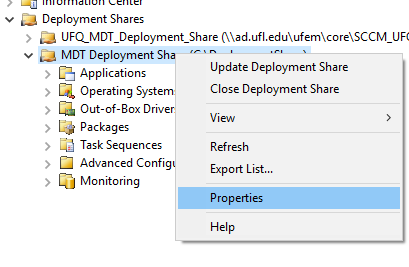
In the properties window, you can modify the settings you made during share creation. Go to the ‘Monitoring’ tab:

Place a check next to ‘Enable monitoring….’. The port info will be filled with the defaults. Make note of the ports that you choose here, as your endpoints will need to be able to reach this machine via those ports.
Navigate back to the ‘Rules’ tab:
Copy the contents of this text field for later use. Click OK.
Integrate Configuration Manager with MDT
Run through the process outlined in the ‘Installing ADK and MDT’ section above on the admin workstation that is running your SCCM console. Be sure to close out all SCCM console session on the workstation first.
Run the ‘Configure ConfigMgr Integration’ utility on the admin workstation. This utility should be listed on the Start menu of any machine that has MDT installed. Fill out the ‘actions to perform’ section of the wizard as illustrated below:

Click ‘Next’ and ‘Finish’ to complete the integration setup. Now, when you open the SCCM console, you will see new MDT options as illustrated in the MS articles describing SCCM/MDT use:
- https://docs.microsoft.com/en-us/windows/deployment/deploy-windows-sccm/create-a-custom-windows-pe-boot-image-with-configuration-manager
- https://docs.microsoft.com/en-us/windows/deployment/deploy-windows-mdt/create-a-task-sequence-with-configuration-manager-and-mdt
Pointing your TS to your MDT Monitoring Point
This document will not get into the details of MDT use inside the SCCM console. Please refer to the linked articles above for more details on these processes. We will look at one part of the MDT TS creation process that is relevant to this document, and that is, how to point your OSD TS to your MDT monitoring point.
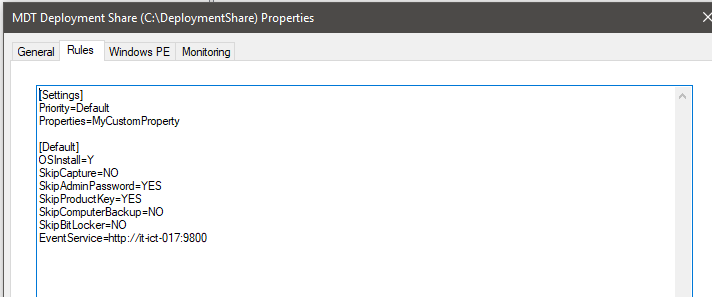
Every MDT TS has a ‘Settings’ package. Inside this package is a file named ‘CustomSettings.ini’. After creating your MDT TS, navigate to the source share for your settings package and open up the CusomSettings.ini file in a text editor. You will see something like this:
[Settings]
Priority=Default
Properties=MyCustomProperty
[Default]
OSInstall=Y
SkipCapture=YES
SkipAdminPassword=NO
SkipProductKey=YES
Previously in this document, you were instructed to copy the contents of the text box under the Rules tab in your MDT deployment share settings. We want to paste the contents of that text box here. Most importantly, we want to be sure to add the ‘EventService’ entry. This is what will tell your TS to report to your MDT monitoring point. Save and close the text file. Since we have altered the content of our source share, we now need to update the distribution points by right-clicking on the settings package and selecting ‘Update Distribution Points’.
Enable WinPE remote connection (via DaRT) in SCCM
Installing DaRT
DaRT will need to be installed on any workstation that will be remoting into WinPE TS sessions.
DaRT is a collection of components that allow admins to remote into running OSD TS deployments. Part of DaRT is embedded in the boot image used in the TS, and part is resident on the admin’s workstation to gain remote access to the OSD PE environment.
https://docs.microsoft.com/en-us/microsoft-desktop-optimization-pack/dart-v10/
From the MS article linked above….
“DaRT 10 is a part of the Microsoft Desktop Optimization Pack (MDOP). MDOP is part of Microsoft Software Assurance.”
The latest version of MDOP can be downloaded from the Microsoft Volume Licensing Service Center. Please direct software licensing questions to Software Licensing Services at UF.
There are multiple methods of installing DaRT on your admin workstations. Please refer to the following MS article that goes into detail on each method
https://docs.microsoft.com/en-us/microsoft-desktop-optimization-pack/dart-v10/how-to-deploy-dart-10
You can safely install all DaRT components on a workstation, but you will only need the ‘DaRT Remote Connection Viewer’.
Note: The boot image used in your TS will need to have the DaRT component enabled.
Installing the SCCM DaRT Remote Console Extension
Although you can already start a remote session through the MDT Workbench, the following procedure will allow you to add a right-click option to devices in the SCCM console to initiate a remote DaRT session.
- Close all open SCCM console sessions on the workstation
- download the DaRT remote viewer console extension.
- Extract the Start-DaRTRemoteViewer.zip to C:\Temp\DaRT on your Primary Site server.
- Copy Start-DaRTRemoteViewer.ps1 from C:\Temp\DaRT to C:\Scripts.
- Edit DaRT.xml in C:\Temp\DaRT on the line that starts with <Parameters> and replace the value for the following script parameters to reflect your environment:
DeploymentShare (should point to the DeploymentShare root directory)
DaRTRemoteViewer (should point to the DaRTRemoteViewer.exe) - Here’s an example row:
<Parameters>-windowstyle hidden -executionpolicy bypass -file "C:\Scripts\Start-DaRTRemoteViewer.ps1" -ComputerName ##SUB:Name## -DeploymentShare "D:\DeploymentShare" -DaRTRemoteViewer "D:\Microsoft DaRT\v8.1\DartRemoteViewer.exe"</Parameters>
- Browse to <ConfigMgr console root directory>\XmlStorage\Extensions\Actions and create the following two folders:
3fd01cd1-9e01-461e-92cd-94866b8d1f39
ed9dee86-eadd-4ac8-82a1-7234a4646e62 - Copy DaRT.xml from C:\Temp\DaRT into both of the folders above.
- Re-launch the ConfigMgr console.
Please note that you won’t be able to remote to a machine running a TS until the DaRT component is enabled, which doesn’t happen for about 3 min into the build process.