Accessibility
UFApps has many Accessibility features available. The information below may help to answer some of your Accessibility questions.
Windows has many useful Accessibility features built into the user interface. All of these built-in Accessibility features should be available to anyone using UFApps.
Important: You will have the best user experience if you use the Horizon Client software. Please install the Horizon Client on your device if you have not done so.
- Login to UFApps using the Horizon Client.
- Once the virtual Windows Desktop is loaded, open the Settings app. There’s multiple ways to open the Settings app that are listed below.
- Use the “Windows key + U” (the letter “you”) keyboard shortcut. This will open directly to the Accessibility settings.
- Open the Start Menu. Type “Settings” into the search bar. Click “Settings” in the search results.
- Click the “Settings” icon in the “Pinned” section of the Start Menu.
- Open the Start Menu. Click “All apps.” Scroll down to find the “Settings” icon.
- In the Settings app, click “Accessibility” on the left side. See the picture below.
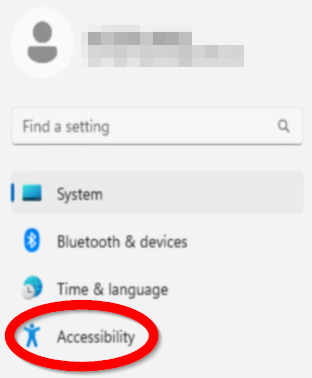
- You should see all the built-in Accessibility features including Narrator, Magnifier, text size, and mouse pointers.
Windows in UFApps has built-in Accessibility features to change the appears of your mouse cursor to make it easier to see. Changing mouse settings will only affect your sessions within UFApps. Settings on your local computer or UF computer labs are not affected.
Important: You will have the best user experience if you use the Horizon Client software. Please follow the instructions for installing the Horizon Client on your device.
- Login to UFApps using the Horizon Client.
- Open Windows Accessibility features.
- Click on "Mouse pointer and touch."

- Here you will find many options for changing your mouse cursor for your UFApps sessions. Including options like:
- Change the cursor size.
- Change the cursor color to a custom color.
- Invert the cursor color or enable "High-contrast" mode.
- Add a circle around your cursor.
Windows Narrator is a simple, effective screen reader that is built into Windows in UFApps. Narrator should be available to all UFApps users.
Important: The "keyboard shortcut" process to open Windows Narrator will only work while using the Horizon Client software. Please install the Horizon Client on your device if you have not done so.
- Login to UFApps using the Horizon Client.
- Open your desired UFApps option: "Regular Applications" or "Graphics Applications."
- Wait until the Windows Desktop has loaded.
- Use the "Windows + Ctrl + Enter" keyboard shortcut or search the Start Menu to open Windows Narrator.
- Hold down the "Windows logo" key. Hold down any "Ctrl" key. Press any "Enter" key. Release all 3 keys at the same time.
- Open the Start Menu. Type "narrator" in the search box. Press the "Enter" key.
- Windows Narrator should open and begin speaking.
Horizon Client can display a Windows Desktop that takes up your entire screen. It can get confusing switching between your local computer and the virtual Windows Desktop in the Horizon Client. You can lose track of which device you’re actually interacting with. Setting your Horizon Client to open to Fullscreen automatically can help with this confusion.
Important: These instructions only apply to the Horizon Client software installed locally on your computer. Please install the Horizon Client on your device if you have not done so.
- Login to UFApps using the Horizon Client.
- You should see 2 options to select from: "UFApps – Graphics Applications" and "UFApps – Regular Applications."
- Click on the "3 dots" menu button in the bottom-right corner of one the "UFApps" options. A menu should open.

- Click on "Display."

- Select either "Fullscreen – All Monitors" or "Fullscreen – Single Monitor" depending on your needs. Be sure to repeat this process for both the "Graphics Applications" and the "Regular Applications" options.
- Selecting "Fullscreen – All Monitors" will set the Horizon Client to use all your monitors if you use multiple monitors on your local computer.
- Selecting "Fullscreen – Single Monitor" will set the Horizon Client to use one monitor at a time.

- When loading a virtual Windows Desktop in UFApps, a toolbar will appear at the top of your screen. See the picture below.
- To exit Fullscreen Mode, click "Exit Fullscreen" on the toolbar.
- To minimize the Fullscreen window, click the "flat bar" Minimize button on the toolbar.
- To disconnect your UFApps session, click the "X" button on the toolbar.

Windows Narrator is available for all UFApps users. You can set Narrator to start automatically when you login to Windows in UFApps. Changing Narrator settings will only affect your sessions within UFApps. Settings on your local computer or UF computer labs are not affected.
Important: You will have the best user experience if you use Windows Narrator with the Horizon Client software. Please follow these instructions to install the Horizon Client on your device if you have not done so.
- Login to UFApps using the Horizon Client.
- Open Windows Narrator.
- Open the Settings app.
- Go to the Accessibility settings. Then the "Vision" section.
- Click on "Narrator" to open the Narrator settings.
- Click on "Narrator" to show more settings and expand the section.
- Click on the box next to "Start Narrator after sign-in" to check it.
- Next time you login to UFApps, Narrator should automatically open.
UFApps provides access to Freedom Scientific’s JAWS, ZoomText, and Fusion software for all UFApps users. Please read the following information for the best experience:
Launching UFApps and Initial Setup
We recommend the following:
- Open UFApps using the Horizon Client: If you haven’t installed the Horizon Client, please follow the Horizon Client installation instructions.
- Use Fullscreen Mode: This is usually the default setting. To verify, navigate to: "Graphics Applications" or "Regular Applications." Then select "More Actions." Followed by "Display," and finally "Fullscreen – All Monitors."
- Start Your Screen Reader within UFApps: The screen reader on your computer will not work within the UFApps virtual environment. After UFApps loads, use (Windows key + Ctrl + Enter) to start Windows Narrator. You can then launch your preferred screen reader (i.e. JAWS, ZoomText, or Fusion) and turn off Narrator.
- Open Screen Reader at Login: JAWS, ZoomText, or Fusion can be configured to open automatically when you login to UFApps, please contact the Disability Resource Center or submit a UFIT Help Desk ticket for UFApps. You can configure Windows Narrator to start automatically on your own.
Exiting UFApps
To logoff from UFApps, select the "Logoff" icon on the Desktop or type "logoff" in the Windows search bar and press the "Enter" key.
Software Compatibility
Fusion and ZoomText are only compatible with the "Graphics Applications" option in UFApps. JAWS is compatible with both the "Regular Applications" and "Graphics Applications" options in UFApps.
Using UFApps
The Horizon Client transmits your keystrokes and mouse clicks to the UFApps virtual desktop. Trackpad gestures will only affect your local computer.
After launching UFApps, a loading screen will appear. Your screen reader may read "Loading desktop," "connecting," then "UFApps application window." The connection process may take several seconds. Once the UFApps window opens, your keystrokes will be directed to the virtual machine.
Get Help with UFApps
Submit a Help Request to request an application, report an issue, leave feedback, or request training.