R Drive: Course Folders
As part of the UFApps service, faculty can request course specific storage on a semester-by-semester basis. Hosted on the R: drive, course folders are ideal for handling larger files and data sets, potentially offering a dramatic increase in performance. A course folder typically consists of:
- A data folder useful for distributing files to your students
- A students folder which provides each student their own workspace
If you would like to request a course folder for your class, please fill out our Course Usage form.
R Drives are meant for academic course work only. Research data or sensitive data is not allowed.
- Login to UFApps
- Launch the "R Drive File Storage"
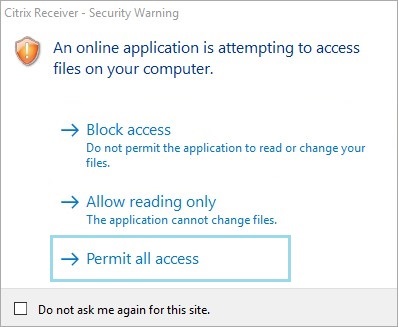
- When starting the R: Drive application the following windows might open a security warning. Please select "Permit all access". (To skip this window next time, check the "Do not ask me again for this site" box at the bottom of the window.)
- When the R: drive opens, you will be presented with a File Explorer window displaying its' contents. Open the "Courses" folder.

- Once in the "Courses" folder, you should see your course, as seen in the example below. Go ahead and open it.

- Inside, you should find a folder for your course data/assignments, and a "Student" folder. Open the "Student" folder.

- Create a folder with your name by right clicking in the empty space, selecting "New", and then clicking "Folder".

- Now you should see your student folder with your name, as shown in our "Alberta Gator" example below.

- Click the back button and open the folder with your course data/assignments, and copy the necessary files into your student folder that you just created. This can be done by first right-clicking on the appropriate files and selecting "Copy", then opening the folder with your name, and right-clicking and selecting "Paste".
- If you need any further assistance, ask your instructor or contact the Help Desk at (352) 392-HELP.
Please note our policy for the end of semester removal of course folders:
Course folders are deleted 30 days after the beginning of the following semester.
Get Help with UFApps
Submit a Help Request to request an application, report an issue, leave feedback, or request training.