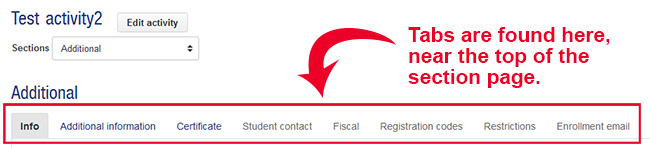
When you first create a section the screen will automatically display the Info tab (one of eight tabs), notice it is gray in color indicating the tab is active. The image below shows the location of all eight tabs that will display for every section.
As you can see, there are several fields located on the Info tab. You will also notice that the page itself is quite long. To make it easier to discuss the Info tab it is divided into three sections below, the top portion, the middle portion, and the bottom portion. In the QuickReg application these three images will actually be displayed as one continuous page.
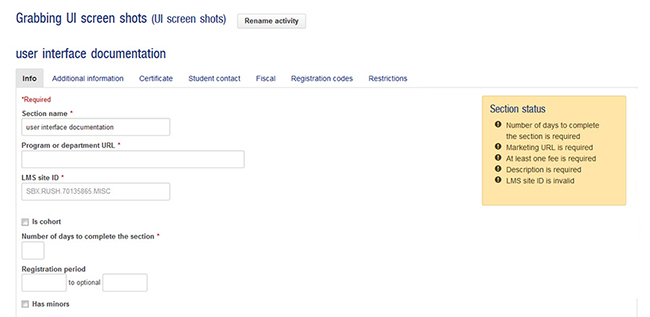
The top portion of the Info tab contains the following fields:
Section name* — required field; Give your section a name.
Program or department URL* — required field; enter the website URL that explains your program or course. If you don’t have a specific website for your program enter your department’s website URL. This URL will be displayed on the section’s registration page. Do not enter the Canvas course URL here.
LMS site ID* — required field; enter the Canvas site ID here. Instructions for finding the Canvas site ID can be found on the QuickReg set-up page.
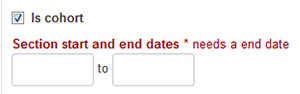
Is cohort — optional field; if your course has specific start and stop dates, click this check box. You will then be able to enter the specific dates for the class. See the image below.
Number of days to complete the section* — required only if the “Is cohort” box is left unchecked. Enter the number of days your students will have to complete the course once they register.
Registration period — optional field; if you wish to have specific registration dates enter them here. You can enter either a begin registration date, an end registration date, or both dates.
Has minors — optional field if no minors; select this check box if the course is aimed at K–12 students or persons under the age of 18. If your course will include minor-aged participants you will need to contact the Office of Youth Compliance Services to see if additional requirements need to be put in place.
The middle portion of the Info tab provides an area where you can add fees to your section and enter the description of the course being offered.
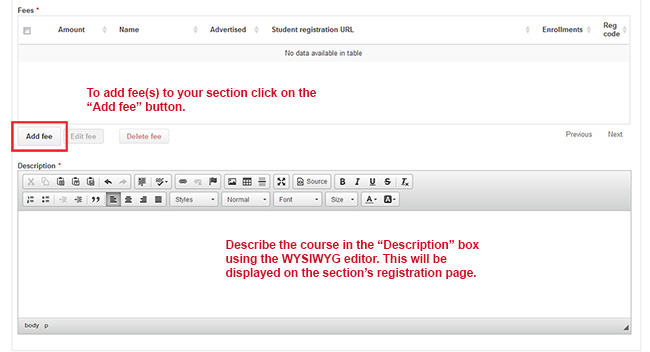
Fees* — required field; enter the fee(s) for this section by clicking on the “Add fee” button. Create a 0.00 fee if your section is free. Instructions for adding a fee.
Description* — required field; describe to potential students what the course offers. For example state learning objectives, who would benefit from taking the course, instructor information, etc. You can include images if you wish. When students view the section’s registration page they will see the description.
The bottom of the Info tab displays an alert box if there is missing data. You will also find the “Save this section” button, “Create new section” button, “Duplicate this section” button, “Bulk edit sections” button, and the “Delete this section” button. This information will display on all tabs.

Save this section button — saves the section you are currently working on.
Create new section — creates an entirely new section under the same activity as the existing section.
Duplicate this section — copies over all fields (except the registration codes) to a new section. You will be able to name the duplicate section. A new fee URL will automatically be created for any fees copied over from the original section. Does not delete the section the duplicate was created from. The duplicate section is placed under the same activity as the original section.
Bulk edit sections — if your activity has more than one section, you will see a “Bulk edit sections” button. Instructions for bulk editing sections.
Delete this section — deletes the section that is currently displaying in the window.