Understanding the Quick Registration Process

Programs are the main functional categorization within QuickReg and control administrative access, fiscal accounts, and contact information.

To set up a program in QuickReg, please submit the New QuickReg Program request form with the program information and associated college/unit as explained below.

To request administrative access to an existing QuickReg program submit a help request.

QuickReg Structure

In order to understand how access is granted in QuickReg, it helps to know how QuickReg is structured. Overall, QuickReg is hierarchically organized in a one-to-many relationship from left to right:

  • College/Unit → Programs → Activities → Sections

Therefore, a program may contain multiple activities, but a program may only be assigned to one college or unit. When someone is granted access at the program level, they can control activities and sections within that program, but they cannot control activities and sections in other programs. However, someone may have access to several programs.

Colleges/Units

Colleges/Units are an overall designation for categorization and display of QuickReg programs. The available designations currently are:
  • Academic Health Center
  • Agricultural and Life Sciences/IFAS
  • Continuing Education
  • Dentistry
  • Design, Construction and Planning
  • Education
  • Engineering
  • Fine Arts
  • Harn Museum of Art
  • Health and Human Performance
  • Journalism and Communications
  • Levin College of Law
  • Liberal Arts and Sciences
  • Medicine
  • Museum of Natural History
  • Nursing
  • Pharmacy
  • Public Health and Health Professions
  • Veterinary Medicine
  • Warrington College of Business

Programs

Due to fiscal requirements, TSS Client Applications Support (TSS-CAS) staff must set up all new programs. The following information is needed to create a program, and should be submitted via the New QuickReg Program request form:

  • College or Unit—select the appropriate unit from the drop down list, if your unit is not listed, submit a "Provost/AA Application Support" help request and ask to be added.
  • Department—give your department name or Department (PeopleSoft) ID number.
  • Program Name—the program name should be generic enough to cover any future activity that will be created under the program. The program name is displayed on the "All Activities" page (if registration for an activity is available to the general public).
  • Program URL—do not enter the Canvas course URL here, rather this should be the publicly available website URL that explains the activity and contains the link to QuickReg for registration. If you don't have a specific marketing website for your activity, enter your department or unit's full website URL. This URL is displayed on the activity's registration page.
  • Registration Management—select who will manage the registrations for this program.
  • Administrative Users—list the individuals who will have rights to view and edit all activities within a program.
    • Name
    • GatorLink ID
  • Primary Contact—enter the name and email address of the person who is responsible for the program.
  • Student Help Contact—provide contact information for potential and current students that may have questions about an activity offered under this program. This information will be displayed on the activity's registration page.
    • Email
    • Phone
    • Physical Address (street address)
    • Fax (optional)
  • Fiscal Contact* — if activities within a program will charge fees, the person responsible for the financial aspects (such as handling refunds) needs to be identified. UF's Division of Finance and Accounting will also contact this person if there are questions concerning the credit card charge.
    • Name
    • Email
    • Phone
    • Department/Unit
  • PeopleSoft Account* — if activities within a program will charge fees, the PeopleSoft chart string for depositing the credit card revenue needs to be identified.

* All fiscal accounts and contact personnel must be approved by the Director of the Associate Provost's Academic Finance Office.


How Activities and Sections Work

Once someone has administrative access to a QuickReg program, they can create activities and sections within that program at any time. Please note, registrations cannot be opened to prospective students until at least one section is created per activity.

The new QuickReg user interface features a more streamlined section-creating process. You will no longer be creating activity templates, instead you will only name an activity that you can then create sections under it.

Understanding the Activity/Section relationship

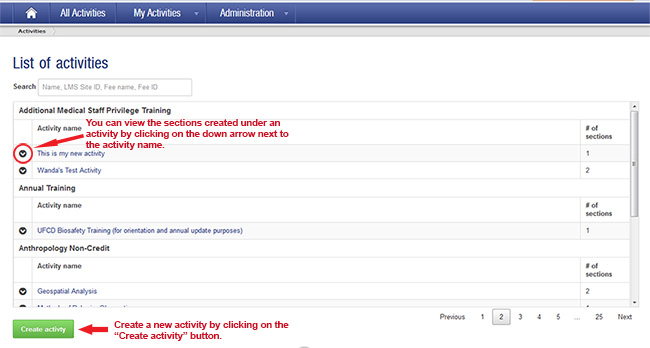
You can see all of your activities and the sections created under each one on the “List of activities” page (requires log in). This is also where you can create a new activity by clicking on the green “Create activity” button found on the lower left. See the image below.

Once you click on the "Create activity" button, you will see the dialog box as shown below:

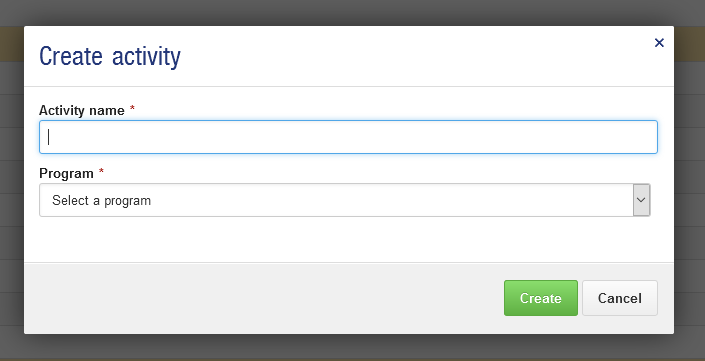
The "Create activity" dialog box as shown above only asks for two things, but both are required fields They are:

  • Activity name (can be changed later, if necessary)
  • Program—select the program this activity will be placed under

When you are finished filling out these fields, click on the green "Create" button. Your new activity will be created and you will be prompted to create a section as shown in the image below:


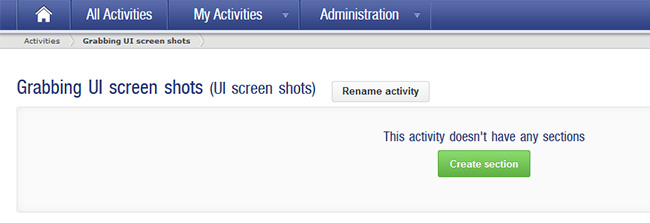
So activities are now just placeholders (so to speak) where your sections will reside. To see more about creating sections visit the "Creating Sections" web page.


How to find the Canvas SIS ID

When creating sections you will need to know the Canvas SIS ID number. Follow the steps listed below to find the number.

  1. Log into Canvas
  2. Navigate to the course
  3. Then select "Settings" (number 1 in the image below)
  4. Click on the "Sections" tab (number 2 in the image below)
  5. The SIS ID should be displayed (number 3 in the image below)

how to find the Canvas SIS ID

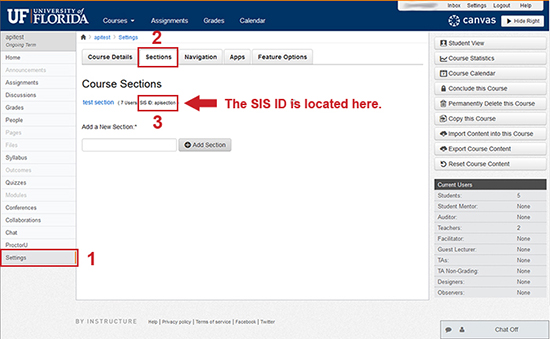
Please be aware that there may be a list of sections, each with their own unique ID. Select the section ID that ends with ".MISC" and then copy and paste this ID into the LMS site ID field located on the "Info" tab for the section. Do not select the words "SIS ID:" when you copy and paste the number, you only need the actual number.