The UF Voting application is a simple to use web application created for the sole purpose of allowing UF departments to create, administer, and tabulate online elections as they relate to university divisions, groups, and colleges. Common uses include Faculty Senate elections, Promotion and Tenure evaluations, and other college and department based polls.
This application is not intended to be used by, or for, any student related or sponsored groups that need a voting tool.
The application is comprised of Ballots, Elections, Candidates, and Voters. A single ballot can contain multiple elections and each election, in turn, can contain as few as two and as many as 100 candidates. Voters are simply the list of people that have been given access to vote on a particular ballot.
Behind this structure is an administration section where administrators can set up ballots, elections, candidates, and add lists of voters for those ballots.
To be able to create and administer ballots in the Online Voting system a user group for your department or unit will need to be created. Once this is set up, we can add a person, or people to administer ballots for this user group. Please note that anyone in this user group will have full access to all of the ballots created under the group.
To have a user group created for your department or unit for the Online Voting application send an email to voting@aa.ufl.edu with the names and UFID(s) of the person or people that will be the group's administrators, along with your department/unit/college and intended usage of the voting system (Tenure, Promotions, etc) The initial administrator(s) will also be able to add/remove additional administrators as needed.
For example, the email may read:
I would like to request access to the voting system for the office of the dean at the college of warrington. We will be using the voting system for our tenure and promotion.
The administrators will be:
Firstname Lastname UFID: XXXXXXXX
Thank you!
Unfortunately, for an anonymous ballot a list of voters who have not yet participated is not available. This is for the protection of the anonymity of the voters. There may be voters on your ballot who wish to not take part in an election. Being able to run a list that shows who has not yet voted undermines the protection of these voter's identities. It should be noted that adding an "Abstain" option to your election does not resolve this issue as any voter has the right to not participate in any given election in its entirety and have that choice be protected by the ballot's anonymity. This expectation would be violated by the availability of a list of voters who have not participated. We recommend sending an email out to all voters that begins "If you have not yet voted..."
This is a quick start guide on how a typical P&T Ballot would be configured. It is highly recommended that ballot administrators read all Voting Administration sections thoroughly to fully understand the processes and options available to you and your voters through the Online Voting application.
The UF Online Voting system consists of Ballots, Elections and Candidates.
A ballot can have multiple elections.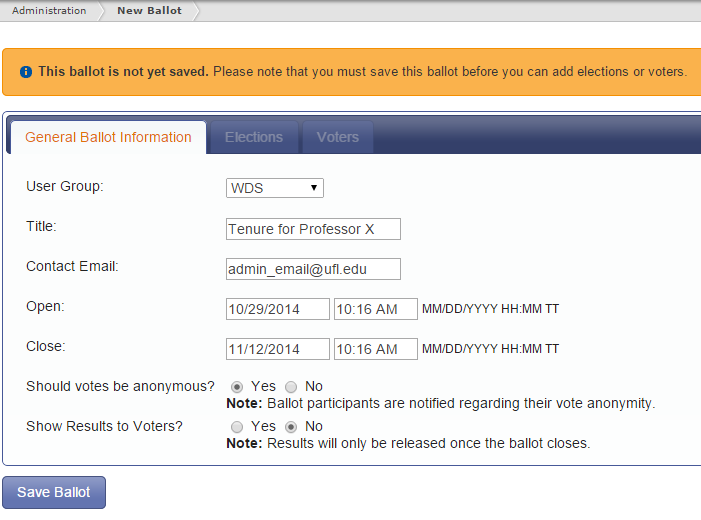

Voting administrators are able to create new ballots and elections as well as manage the candidates and voters for those ballots.
When logged into the application as an administrator, you will see a special "Administration" tab at the top of the page. Clicking on this will bring you to the administration dashboard.
From this dashboard you can

Administrative Groups
UF Voting administers ballots via administrative groups. This way, multiple people can administer and manage a ballot rather than a single person. Ballot administration currently has two levels of administrative roles. The two role types are Admins and Editors. Both role types are able to create, delete, and modify ballots for their user group(s). Only Admins are able to add, modify, and remove members from their administrative groups.
The administrative control panel can be accessed by clicking on the Administration tab of the Administrative Dashboard. Here you will find a list of all groups that you are a member of, as well as your role type for each group.
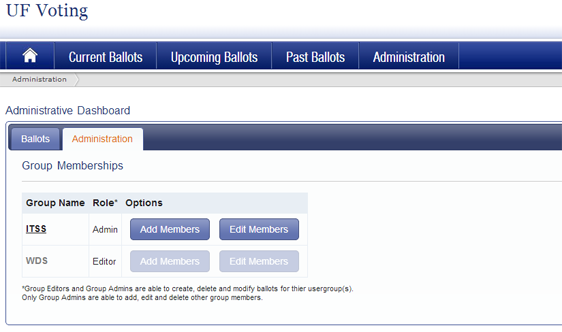
Note that in this screenshot, the buttons to administer group members for WDS is disabled. This is because the user is an Editor for the WDS group. Only Admin roles are allowed to edit group member information.
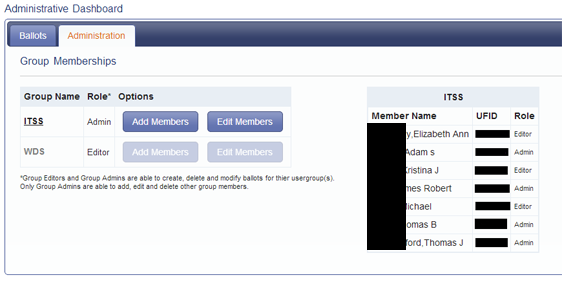
To view each group's member information, simply click on the Group Name and a grid with group member information will appear on the right.
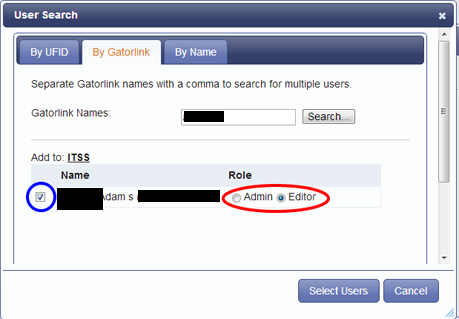
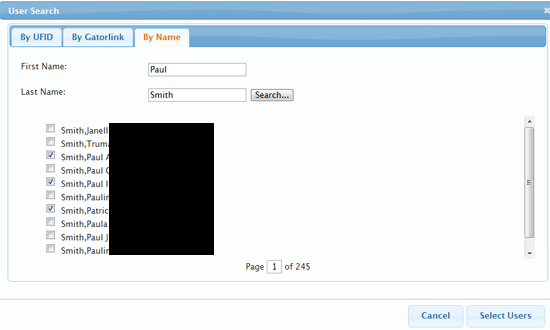
To add a new member to the group, click on the Add Members button. This will bring up the Member Search dialogue. You may search for members via UFID, GatorLink, or by Name. Once you have found the member you would like to add, you must then select the role type desired for the user (highlighted in red). Once this is done, check off the user you would like to add (highlighted in blue), and press the Select Users button.
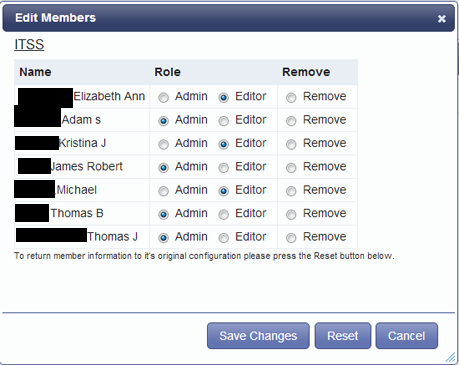
To edit or remove existing group members, select the Edit Members button from the Administrative Dashboard's Administration tab. The Edit Members dialogue allows you to change a group member's role type. It also allows you to remove a member from the group. Simply select the changes you wish to make for any group members and click on the Save Changes button. If you have selected changes and not saved them, but wish to undo them, or see what the initial group configuration was, you may click on the Reset button. This will reset all members and role types to their initial configuration. You may also select the Cancel button at any time and no group changes will be made.
We recommend creating your ballot at least 24 hours before it is due to open.
A new ballot requires the following information

Once you have this data filled in, make sure to press the Save Ballot button at the lower left hand corner of the window.
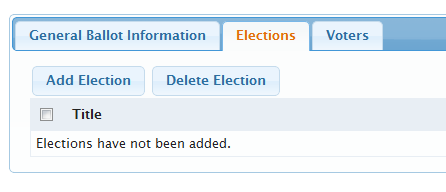
Once you have saved the ballot you will notice that the Elections and Voters tabs are now available to you.
To add an election to a ballot go to the Elections tab of your ballot and press the Add Election button.
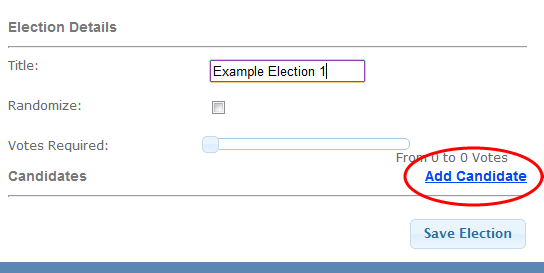
Setting up an election requires the following information:
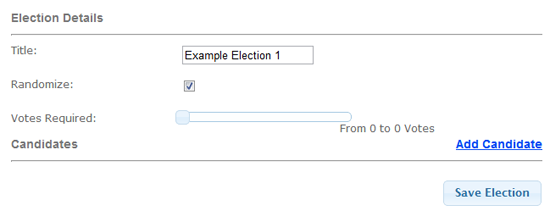
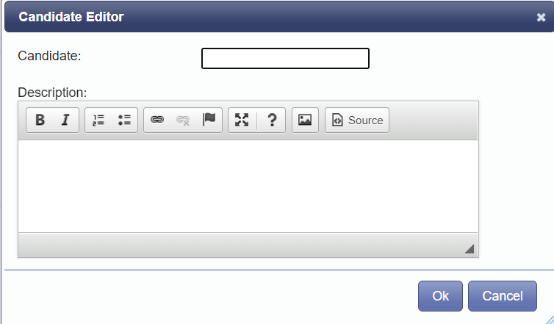
When creating an election, you must add candidates before you are allowed to save the election. To add candidates you need to click on the "Add Candidates" link on the lower right hand corner of the Election Details screen.
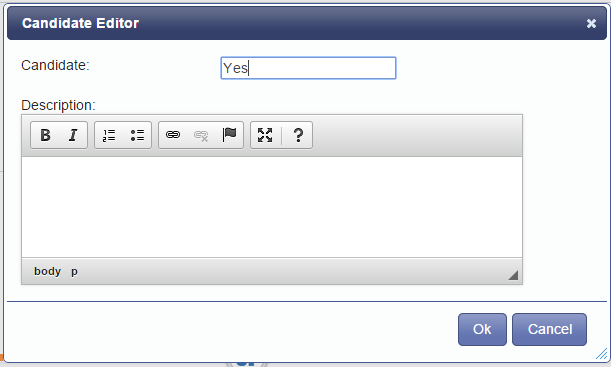
A window will appear allowing you to enter a single candidate as well as add any description you would like for the given candidate. Hit the OK button to add the candidate. Repeat this process for each candidate you wish to enter.
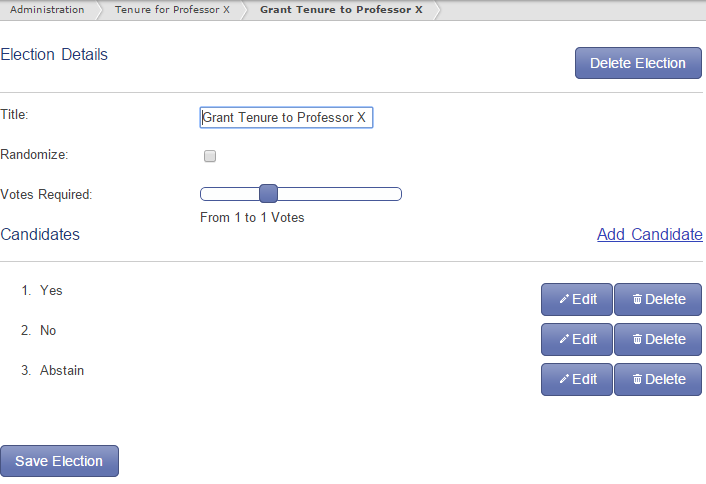
You will now see your added candidates associated with the election.
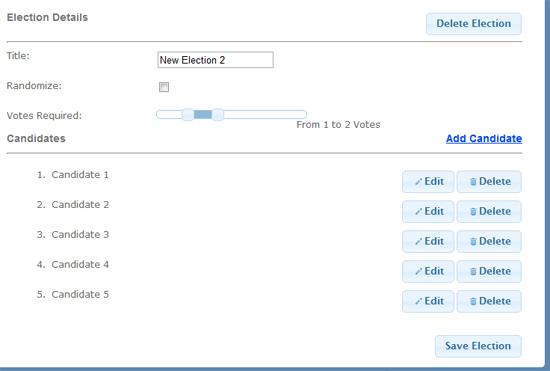
Important! After you have added your candidates you should adjust the Votes Required slider. This slider tool allows you to select a Min/Max range for the votes required by a voter for a given election. So, for example, say an election has 10 candidates and the Votes Required field for the election is set to "From 3 to 5 Votes". This means that the voter would be required to select a minimum of three candidates and a maximum of 5 candidates for this election. If you only wanted to allow a single candidate to be selected, you would select "From 1 to 1" from this field.

Be sure to save the Election after you have finished adding candidates.
You may add as many elections as you'd like for a single ballot. To add more elections to a ballot, simply repeat the process outlined above. NOTE: You cannot alter a ballot or any of its elections after voting has begun.
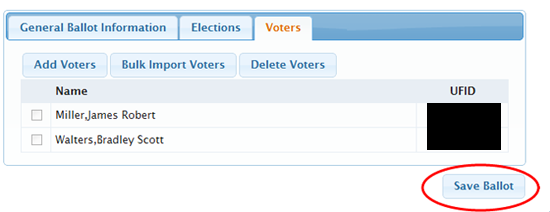
To add voters to an election, select the "Voters" tab of your Ballot. You will see three buttons.

The "Add Voters" button will allow you to add voters by UFID, GatorLink, or Name. Entering information in the search fields will produce a list of checkboxes. To add voters, simply select the checkbox of the person/people you wish to add and click on the "Select Users" button.
After adding voters, you will see them listed under the "Voters" tab. After adding voters to an election, be sure to click the "Save Ballot" button on the lower right corner of your screen. Failing to do this after adding voters will mean that the voters you just added will not be included on this ballot.
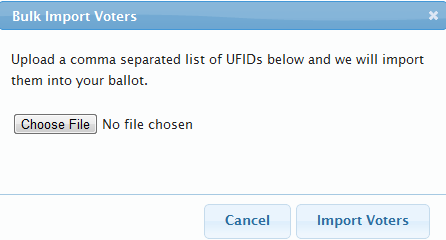
There is also an option to bulk import voters into a ballot. You may do this by adding a list of UFIDs to an Excel spreadsheet and then saving that spreadsheet as a command delimited list (.csv).
After creating your .csv file of UFIDs, select the "Bulk Import Voters" button located in the "Voters" tab of your ballot. Select your .csv file in the Bulk Import Voters pop up dialogue and then select the "Import Voters" button.
You will then see a checkbox list of all of the UFIDs that were in your .csv file. To select all of those UFIDs click on the radio button at the top of the list.
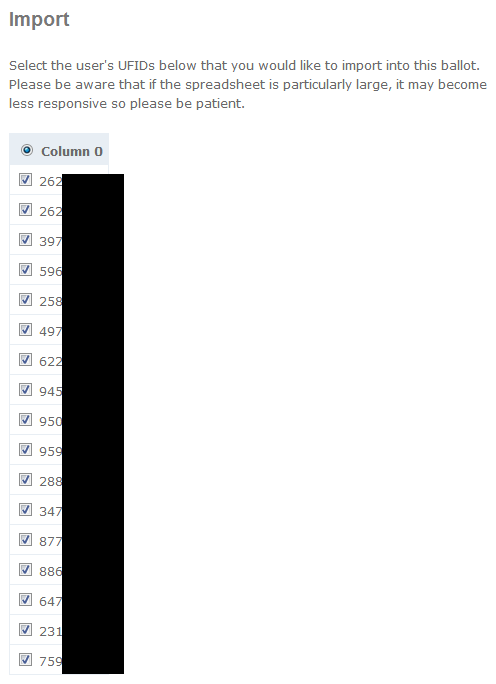
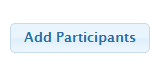
The UFIDs that are checked on this list will be the voters added to your ballot. Once you've checked off the appropriate UFIDs, click on the "Add Participants" button in the lower right hand corner of your screen.
To delete voters from an election, select the voters you wish to delete from the ballot on the Voters tab of your ballot and click the "Delete Voters" button. You can only delete voters before the ballot start date.

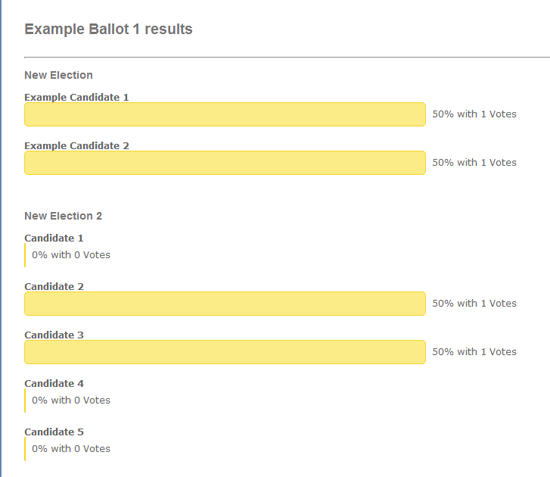
To view ballot results click on the "View" link in the results column for your ballot on the administration dashboard page.
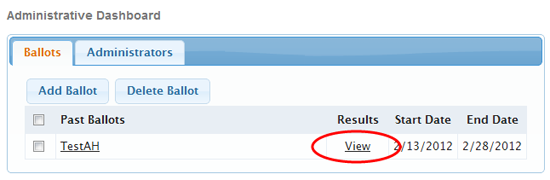
From this page, you will be able to see the results of voting on the individual elections on your ballot. If your ballot was set up as Non-Anonymous, there will be a "View Votes" link atop each candidate of each election. Selecting this link will allow you to see the individual votes for that particular candidate. If the ballot was set up as Anonymous, this link will not be present.

Administrative Groups
UF Voting administers ballots via administrative groups. This way, multiple people can administer and manage a ballot rather than a single person. Ballot administration currently has two levels of administrative roles. The two role types are Admins and Editors. Both role types are able to create, delete, and modify ballots for their user group(s). Only Admins are able to add, modify, and remove members from their administrative groups.
The administrative control panel can be accessed by clicking on the Administration tab of the Administrative Dashboard. Here you will find a list of all the groups that you are a member of, as well as your role type for each group.
Note that in this screenshot, the buttons to administer group members for WDS is disabled. This is because the user is an Editor for the WDS group. Only Admin roles are allowed to edit group member information.
To view each group's member information, simply click on the Group Name and a grid with group member information will appear on the right.
To add a new member to the group, click on the Add Members button. This will bring up the Member Search dialogue. You may search for members via UFID, GatorLink, or by Name. Once you have found the member you would like to add, you must then select the role type desired for the user (highlighted in red). Once this is done, check off the user you would like to add (highlighted in blue), and press the Select Users button.
To edit or remove existing group members, select the Edit Members button from the Administrative Dashboard's Administration tab. The Edit Members dialogue allows you to change a group member's role type. It also allows you to remove a member from the group. Simply select the changes you wish to make for any group members and click on the Save Changes button. If you have selected changes and not saved them, but wish to undo them, or see what the initial group configuration was, you may click on the Reset button. This will reset all members and role types to their initial configuration. You may also select the Cancel button at any time and no group changes will be made.
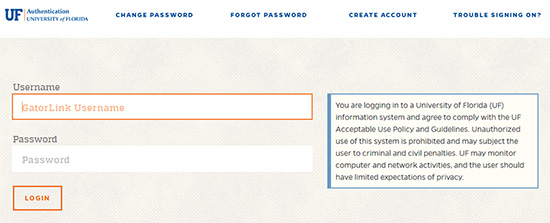
All users of the voting application are required to log in using their GatorLink username and password.
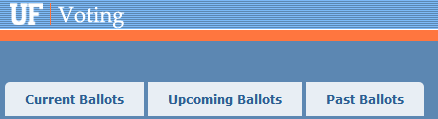
Once logged in the voter will be presented with three self-explanatory tabs, Current Ballots, Upcoming Ballots, and Past Ballots.
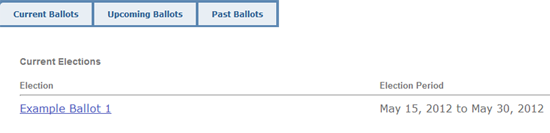
If the voter has been assigned to any currently active ballots they will see those ballots on the "Current Ballots" tab.
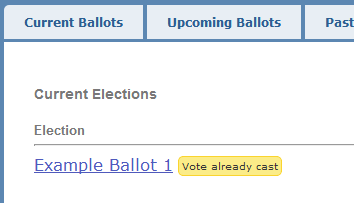
If the voter has already voted on any current ballots they will be notified on this tab.
If the voter has not already voted on a current ballot, then they can access the ballot by clicking on the ballot link. Once clicked they will be presented with the Elections and Candidates associated with that ballot. Simply select the candidate(s) you want to vote for and click on the large "Cast Your Ballot" button on the bottom of the ballot.

When a ballot manager is setting up a ballot they have the option to make that ballot's voting anonymous or non-anonymous.
Anonymous voting
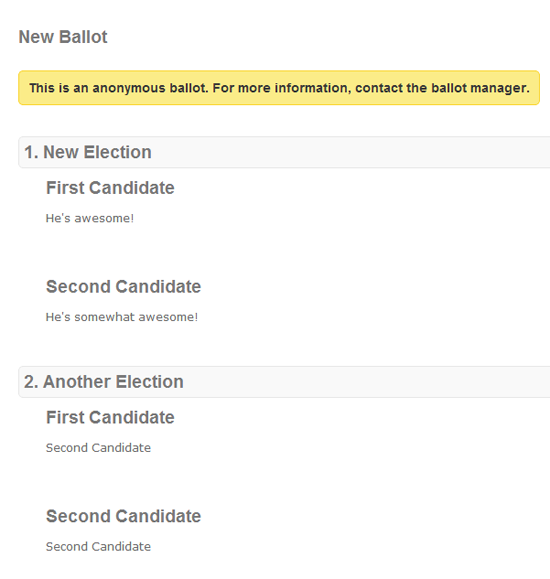
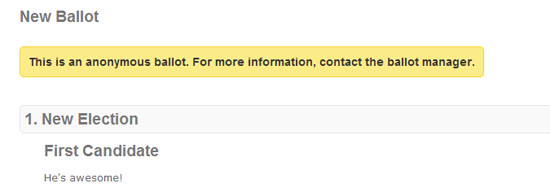
If the ballot is made anonymous then your vote is entirely anonymous. The voting application records the vote for the candidate(s) you voted for as well as records the fact that you voted, but there is no association made between the two, meaning that your vote is truly anonymous, even to system administrators. You will know if the ballot is anonymous by this message appearing at the top of your ballot's window when you go to vote.
Non-Anonymous voting
If the ballot isn't made anonymous then your vote is associated with you. This means that the ballot manager is able to look up the data of who voted for who. This feature was created in response to certain votes that are subject to Florida Sunshine Law, requiring that certain data be recorded and kept. You will know a ballot is not anonymous by the following message appearing at the top of your ballot window.

Once your votes have been cast, you will not be allowed to vote on that particular ballot again. When the voting for that ballot has expired, the ballot will be moved to the "Past Ballots" tab. You may or may not be able to see the results of the ballot's elections. This depends on how the ballot was configured by the ballot manager. If they enabled the ballot results to be displayed, you can see the results of the ballot by clicking on the ballot in the "Past Ballots" tab.
If the ballot manager did not allow the ballot results to be public you will only be able to see the ballot's elections and candidates and NOT any voting information.