
Virtual Machine
Windows VMs are cloned from UFIT managed templates. The templates contain Cloudbase-Init and utilize it to bootstrap the VM upon deployment.
Supported Windows Versions
- Server 2025/2022 GUI/Core
General Information
- Windows systems are joined to the UFAD (ad.ufl.edu) domain.
- The UFIT provided templates are automatically patched with the latest version of ALL available Windows patches.
- If the primary disk size is increased from the default 80GB then it must be manually extended in the OS using Disk Manager post deployment. Its strongly suggested to leave the primary disk at 80GB and add additional disks to increase storage.
- A PTR record is created for all Windows machines using the FQDN and IP address the VM is configured with.
- The Administrator account's password is set to a random value. Once the VM joins Active Directory the Administrator password will be created, configured, and stored with Windows Local Administrator Password Solution (LAPS).
- The AD computer object, PTR record, and VM are all destroyed upon deletion.
Requirements
Windows requires that the same user account is used to create the AD computer object and join the OS to the domain. Because of this you will need to grant the "ufit-svc-vmwaa-p-ad" service account the following permissions on any OU (or parent OU) where you want to create the AD computer object.
- ufit-svc-vmwaa-p-ad
- Create all child objects
- Delete all child objects
Because the OS is joined to the domain and the local administrator account password is unknown you will need to either have Group Policies or use Cloudbase-Init to configure local group memberships, firewall, and RDP settings.
For more information about Cloudbase-Init see
https://cloudbase-init.readthedocs.io/en/latest/
Group Policy
There are three template GPOs you can copy to enable the requirements above. You will want to copy the GPO objects to unique objects your group owns. You will also want to add a group to have "Edit settings, delete, modify security" delegation on the policy object instead of just your user.
Linking to these GPOs is not advised. Copy them to new and modify to suit your needs.
-
- UFIT-Firewall Template (This policy is optional as when you enable remote desktop the firewall rules should be automatically added)
- UFIT-Local Groups Template
- UFIT-Remote Desktop Template
This work flow will deploy a blank VM with no installed operating system. To install an operating system:
- Request a new blank VM using the "Blank VM" catalog item in the hosting portal.
- Connect to the VM via a Remote Console session, mount your OS media ISO, and install your OS.
UFIT builds the UF Hosting Linux templates daily. This means they include all of the latest features.
The Linux images have cloud-init, open-vm-tools, and growpart installed.
Linux VMs are bootstrapped using cloud-init. Input from the catalog request forms are used to build a metadata file to configure the hostname, id, and network interface. Customers must provide user-data that will configure the operating system and its installed software. An example cloud-init user-data cloud-config is provided below.
Supported Versions
RHEL
- 8
- 9
- 10
Ubuntu
- 22.04 LTS
- 24.04 LTS
cloud-init user-data Example
#cloud-config
# rhel only# install the uf satellite repobootcmd: - [ cloud-init-per, once, rhel_default_rpm_gpg_import, rpm, "--import", "/etc/pki/rpm-gpg/RPM-GPG-KEY-redhat-release" ] - [ cloud-init-per, once, trust-satellite-6, yum, "install", "-y", "https://satellite.it.ufl.edu:443/pub/katello-ca-consumer-latest.noarch.rpm" ]
# resize your partitions and volumesgrowpart: devices: [/, /dev/vdb1] ignore_growroot_disabled: false mode: auto
# remove any existing ssh keysssh_deletekeys: true
# set the root password to randomchpasswd: list: - root: R
# get uniqueness from the reddit homepage and add it to /udev/urandom so new host ssh certificates are more uniquerandom_seed: file: /udev/urandom command: ["pollinate", "--server=http://reddit.com"] command_required: true
# create a new usernamed ufuser, add an ssh key, allow sudo without a password, add to the sudo group, disable password loginusers: - name: ufuser ssh-authorized-keys: - ssh-rsa <your_key> shell: /bin/bash sudo: ['ALL=(ALL) NOPASSWD:ALL'] groups: sudo lock_passwd: true
# rhel only# join machine to satelliterh_subscription: activation-key: <my_key> org: <my_org>
# ubuntu only# configure an additional apt repositories# apt:# sources:# hashicorp:# source: "deb [arch=amd64] https://apt.releases.hashicorp.com $(lsb_release -cs) main"# keyid: "E8A7 24E4 A137 0F11 B875 04AD 575A 4133 9713 0783"# keyserver: "keyserver.ubuntu.com"
# rhel only# configure additional yum repositories# yum_repos:# hashicorp:# name: HashiCorp# baseurl: https://rpm.releases.hashicorp.com/RHEL/$releasever/$basearch/stable# gpgcheck: 1# enabled: 1# gpgkey: https://rpm.releases.hashicorp.com/gpg
# install any additional packages you need# packages:# - <package>
# run commandsruncmd: # prevent root login with ssh - sed -i 's/^PermitRootLogin yes/PermitRootLogin no/g' /etc/ssh/sshd_config # restart ssh - systemctl restart ssh
# install ansible and run a playbook# ansible:# package_name: ansible-core# install_method: distro# pull:# - url: https://github.com/holmanb/vmboot.git# playbook_names: [centos.yml]
The clone VM workflow will allow you to select an existing VM and will clone (copy) the VM. You must have at least one existing VM to clone from. After cloning you can remote console to the VM to perform any initial configuration. When cloning a VM the new clone will be an exact copy of the original, including NIC, Satellite (RHEL), Active Directory (Windows) configurations. The cloned machine will not have network access, so you will need to know the local administrator/root password.
Windows VMs are typically ok to clone regardless of settings. On the cloned machine you will want to perform a few cleanup items:
- Rename the machine
- Disconnect from UFAD
- Clean up the old NIC
- Configure the new NIC with the correct IP
- Join to UFAD
Linux VMs - If the MAC address is defined in the NIC configuration, cloning will result in the NIC coming up on the loopback address and you shouldn't have any issues. If the MAC is not defined in the NIC configuration the NIC may try to start on the same IP as the original and cause a conflict.
- Configure the NIC with the correct IP
GROUP RESOURCE LIMITATIONS
To prevent any one group from consuming all available infrastructure resources each business group is allocated an infrastructure resource reservation for each VMware compute cluster which limits the amount of Memory, Disk, and Networks available to a group. UFIT currently has one hosting compute cluster per datacenter. When a group reaches their resource limit new deployments and modifications that go over the limits will fail. When this happens UFIT will increase the limit for the specific resource that has reached the limit.
The default resource limits are as follows:
- Memory - 128GB
- Disk - 4000GB in each tier
- Network - Public and Private Shared Hosting Networks
- If your group has any custom networks those will be added to your reservation.
VM RESOURCE LIMITATIONS
To allow for simple maintenance and efficiency there are default limits on the resources that can be allocated to a VM.
- vCPU - 4
- Memory - 16GB
- Disk - 4000GB per disk
- If you need a larger volume you can extend the volume in the OS using LVM or Disk Manager.
If you feel you need more than the limits please submit a help ticket and UFIT will discuss options with you.
CONNECTING VIA CONSOLE SESSION
You will need to connect to the VM via a console session.
- For instructions on connecting via a console session see the "How can I get console access to my VM?" FAQ item.
MOUNTING AN ISO
You will need to mount an ISO to install your OS from.
- For instructions on mounting an ISO see the "How can I mount an ISO on my VM" FAQ item.
BOOTING TO AN ISO
We will be installing the OS from the ISO very similar to how we do it on traditional hardware.
- Start or restart the VM to get to the BIOS screen by selecting "Player > Power > Power On/Restart Guest".
- After power on press the "ESC" key to get to the Boot Menu, you will have 6 seconds at the BIOS screen.
- Select the "CD-ROM Drive" option.
- Install your OS.
INSTALLING VMWARE TOOLS
You need to install the VMWare tools immediately after you've finished installing the operating system. The VMWare Tools package includes drivers for the virtual video card, disk controller, and network card that the machine needs.
- For more information see the "How do I install the VMware tools?" FAQ item.
If you would like to mount an ISO to your VM to install an operating system or to install software you can do so using the Virtual Machine Remote Console (VMRC) application. See the "How can I get console access to my VM?" FAQ item for instructions on establishing a console session to the VM.
- To connect to the VMRC you must be on the UF Hosting VPN.
- You can find instructions to download and install the VMRC from
- On a VM Item select the "Get Standalone VMRC Link" action.
- Copy the generated URL and paste it into a new browser window.
- If prompted, enter your GLID and password to authenticate.
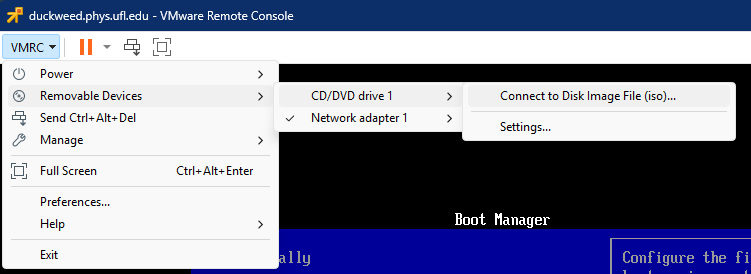
- Select "VMRC" in the top left corner of the VMRC application.
- In the drop down select "Removable Devices > CD/DVD drive 1" > "Connect to Disk Image File (iso)..."
- Browse to the iso file you want to mount and click "Open"
In certain circumstances you may need to access your Virtual Machine directly using a console session. Common reasons for this are loss of network connectivity, a frozen/locked system, or installing an operating system. The instructions below will show you how to connect to your VM directly via a VMware Console session.
VMRC
For either of these methods to work you will need to download and install the VMware Virtual Machine Remote Console (VMRC) application for your workstation OS.
VPN REQUIREMENTS
To connect to the VM via VMRC you must be on the UF Hosting VPN.
- You can get the VPN client from:
- To connect to the UF Hosting VPN enter your username as:
- GLID@ufl.edu/cnshosting
CONSOLE USING HOSTING PORTAL
- Download and install the VMRC application
- In the UF Hosting portal navigate to the Virtual Machine "Item" you want to console to.
- On the VM Item select the "Get Standalone VMRC Link" action.
- Copy the generated URL and paste it into a new browser window.
- If prompted, enter your GLID and password to authenticate.
VMware tools are required to be installed on all VMs.
VMWARE TOOLS OVERVIEW
VMware Tools is a suite of utilities that enhances the performance of the virtual machines guest operating system and improves management of the virtual machine. Without VMware Tools installed in your guest operating system, guest performance lacks important functionality.
If you are deploying a VM using the "Clone", "Windows Server", or "Red Hat Enterprise Linux" (using UFIT kickstarts with version 7 or above), VMware Tools will automatically be installed.
If you deploy a "Blank VM" and install your own OS or use the RHEL catalog item with a custom kickstart you will need to install VMware Tools.
INSTALLING AND UPDATING VMWARE TOOLS LINUX
The supported method for deploying and managing VMware Tools on Linux OS's is to utilize the open-vm-tools package through the OS. The primary purpose for open-vm-tools is to enable operating system vendors and/or communities and virtual appliance vendors to bundle VMware Tools into their product releases. open-vm-tools is the open source implementation of VMware Tools and consists of a suite of virtualization utilities that improves the functionality, administration, and management of virtual machines within a VMware environment.
Installing open-vm-tools on Linux
INSTALLING VMWARE TOOLS WINDOWS
When deploying Windows VMs using the "Windows Server" catalog item in the self service portal, VMware tools are automatically installed.
If you deploy a "Blank VM" and install the Windows OS you will need to manually install VMware Tools.
- In the UF Hosting portal under the "Deployments" tab, select the deployment that contains the VM you want to update.
- Select the VM from the Components tab in the Deployment.
- Click the cog wheel next to the VM Component and select "Install Tools".
- If this process doesn't complete successfully you can mount the tools ISO by running the "Mount Tools" action.
- In the OS install the VMware Tools from the mounted media.
Upgrading VMware Tools Windows
VMware Tools are configured to automatically check the installed version and on Windows machines, update if necessary at each reboot.
If you want to manually update the VMware Tools you can run the "Upgrade Tools" action in the self service portal.
- In the UF Hosting portal under the "Deployments" tab, select the deployment that contains the VM you want to update.
- Select the VM from the Components tab in the Deployment.
- Click the cog wheel next to the VM Component and select "Upgrade Tools".
- If this process doesn't complete successfully you can mount the tools ISO by running the "Mount Tools" action and install manually in the OS.
You can take snapshots of VMs to provide a short-term copy of the VM to revert to in the event a change made to the VM does not go as planned. When you create a VM snapshot a new hidden disk file gets created and all changes to the VM are written to the new hidden disk. Because of this the disk can grow rapidly. It is strongly suggested that you retain snapshots only as long as their required. You will be billed for the disk space consumed by the snapshot disk file at the same rate as the disk tier the real disk is provisioned on while the snapshot file exists.
Snapshots should be kept for the shortest period of time possible. Snapshots can consume disk space quickly and can degrade VM performance.
Snapshots can be taken and manged through the "Snapshot" actions of a VM "Item". There are three snapshot actions available:
- Create Snapshot
- Delete Snapshot
- Revert to Snapshot
Snapshots have the following limitations:
- Maximum of 3 concurrent snapshots per VM
- Snapshots will be automatically deleted after 14 days
To export a VM you will need to log into vCenter, power off the VM and export the VM.
- Log into the VMware vSphere Client with your GLID.
- Navigate to your VM, right click and select "Power > Shut Down Guest OS" to gracefully shut down the system or "Power > Power Off" to power it off.
- Once the VM is powered off, right click it and select "Template > Export OVF Template"
- Provide a destination and name for the exported VM and click "OK"
Your OS can be upgraded but it must be done in conjunction with UFIT.
- Submit a ticket. The Operating System Guest ID and Hardware Version of the VM may need to be updated by UFIT as part of the upgrade. This can prevent the machine from booting properly if not completed.
- Download your upgrade ISO to your local machine
- Follow the instructions on the How can I install my own OS? FAQ item to console to the VM, mount the ISO, and run the installation.
In the event the hosting portal is unavailable you can still access your VM by logging directly into the hypervisor management console. Note that only a subset of the functionality is available in the hypervisor management console. Access here is intended to be a backup to the hosting portal.
Click here to access the VMware vSphere Client
VM NICS
VMs created via the portal can only have one NIC. If you would like to add additional NICs to your VM please submit a help ticket.
VM NICs are placed on a single VLAN and can access any subnet on that VLAN.
NETWORKS
Customers can either request their own networks to use for their VMs or they can utilize one of our "shared" hosting networks.
When using a custom network the requestor will be required to provide an IP address. A PTR record of the VMs FQDN will be created in Infoblox if the VM is in the ad.ufl.edu domain.
When using a shared hosting network an IP address will automatically be assigned to your VM and a PTR record of the VMs FQDN will be created in Infoblox.
NETWORK ACLS
For more detailed instructions on how to request custom network ACLs see the "How can I permit traffic to my hosted VM IP address?" item.
The group_sot assigned to the UF Hosting project will be set as the group_sot for the IPs used for the projects VMs. This allows you to request ACL changes via help tickets.
PRIVATE HOSTING NETWORK
Default ACLs are already in place on the private hosting network to allow connections from UFAD's servers, the UF security scanners, the UF name servers, and port 22 (SSH) and 3389 (RDP) from anyone on UF 10.0.0.0/8 IP space.
PUBLIC HOSTING NETWORK
There are no default ACLs on the public networks. This means that ACLs will need to be filed to open ports for incoming connections that need to communicate with any virtual machine.
ACLs
There are two levels of ACLs
- Network ACLs
- Local Firewalls
Network ACLs are applied at the VLAN level and are only applied when traffic traverses in or out of the VLAN. All east-west traffic within the VLAN will not be evaluated by the network ACLs. Because of this a combination of network ACLs and local firewall is recommended. Network ACLs can be done on a per port level, a per machine (IP) level, or a per-network range model or any combination of the previous. ACLs can be restricted at the protocol level as well - UDP, TCP, both, ICMP.
A balanced approach is to use network ACLs for broader access and local firewalls for finer grain access. In the example below we are setting broad but restricted access in the network ACL then fine tuning it with the local firewall. This allows us to rapidly change access between the three servers using local firewalls while restricting all other access.
An ACL and firewall policy for a 3 tier windows application might look like:
- Web
- Network ACLs
- permit <local_desktop_subnet> <vm_ip> any (allow your desktop subnet to access any port)
- permit <units_vpn_subnet> <vm_ip> any (allow your VPN subnet access to any port)
- permit campus <vm_ip> 80 (allow all campus IPs to port 80)
- permit campus <vm_ip> 443 (allow all campus IPs to port 443)
- permit app any (allow app to access any port on web)
- permit database any (allow database to access any port on web)
- Local Firewall
- permit <local_desktop_subnet> any
- permit <units_vpn_subnet> any
- permit 10.0.0/8 80
- permit 10.0.0.0/8 443
- Network ACLs
- App
- Network ACLs
- permit <local_desktop_subnet> <vm_ip> any
- permit <units_vpn_subnet> <vm_ip> any
- permit web <vm_ip> any
- permit database <vm_ip> any
- Local Firewall
- permit <local_desktop_subnet> any
- permit <units_vpn_subnet> any
- permit <web_ip> 8080
- Network ACLs
- Database
- Network ACLs
- permit <local_desktop_subnet> <vm_ip> any
- permit <units_vpn_subnet> <vm_ip> any
- permit app <vm_ip> any
- permit web <vm_ip> any
- Local Firewall
- permit <local_desktop_subnet> any
- permit <units_vpn_subnet> any
- permit <app_ip> 1433
- Network ACLs
Statistics regarding CPU usage, memory utilization, network performance, and disk performance for your hosted virtual machine are available from the VMware Client. You can view real-time sampled stats, historical statistics for a number of hours, days, weeks, or months, and export these figures to Excel spreadsheet format for further analysis.
- Sign in to the VMware vSphere Client with your GLID
- Select your VM from the Navigator pane on the left.
- In the VM properties pane in the center or right, select the "Monitor" tab.
- On the monitor page select the "Performance" button.
- By default you will see "real time" performance statistics including the last day.
For more information about advanced performance monitoring features please see https://docs.vmware.com/en/VMware-vSphere/6.5/com.vmware.vsphere.monitoring.doc/GUID-17857489-FA76-4EFC-827B-D1C647F818CC.html.
Sizing and Performance
Be sure to follow our sizing and performance recommendations if you choose to modify your VM. See more info about sizing under the "My VM is running slow how can I make it faster?" FAQ item.
See the sizing and performance FAQ for more information.
Yes, see the sizing and performance FAQ for more information.
All hosted VMs have a default backup job defined to run every day and retain the backup for 7 days. This retention period cannot be changed, but additional backups can be manually initiated and these backups will also be retained for 7 days.
When a VM is destroyed, the backups will age out according to the retention period. No changes need to be made to the backup job.
ON-DEMAND BACKUP
An On-Demand Backup is a snapshot that is retained for the retention period defined by the backup job. It does not impact the retention of existing backups and is just added to the chain.
- Navigate to VM Actions.
- From the Action menu, select On-Demand Backup.
- Click the Submit button.
RECOVER A VM
The Recover VM process first makes a VM backup before performing the restore.
- Navigate to VM Actions.
- From the Action menu, select Recover VM.
- Choose a Recovery Point from the list of available snapshots.

- Click the Submit button.
RECOVER A VM FILE OR FOLDER
You can perform a file/folder search, and recover the file or folder to the virtual machine. The Recover VM File process first makes a VM backup before performing the restore.
- Navigate to VM Actions.
- From the Action menu, select Recover VM File.
- Enter a string to search for a file or folder.
- Select the file or folder to be recovered.

- Select the version (backup date/time) of the file or folder to be recovered. "8 Copies" shown in the screenshot below indicates the file to be recovered is the same in all eight backups that exist.

- Selecting “Yes” to overwrite will replace the original file or folder with the backup’s version. Selecting “No” will require an Alternate Restore Path.

- Enter credentials with access to the guest OS and the file or folder be recovered.
- Click the Submit button.
You can have a report emailed to you with details of the backup status of all VMs within a group. The email will contain a list of each VM and its backup details along with an attached CSV with the same data.
- In the hosting portal on the "Catalog" page in the "Virtual Machine" service request the "View VM Backup Status" catalog item.
- On the View VM Backup Status form, enter a comma separated list of email addresses in the "Email" field that you want the report emailed to and click "Submit".